tiOPF |
Free, Open Source Object Persistence Framework for Free Pascal & Delphi |
5. A Worked Example of Using the tiOPF
The aims of this chapter
In the previous chapters, we have seen how to use the Visitor pattern, along with the Template Method to map a business object model into a relational database. We have also developed an abstract business object, and collection object to descend our concrete classes from. In this chapter, we will build on what we have covered and create a working application using the TechInsite object persistence framework.
We shall work through the following steps:
- Write a brief use case for the system we will build
- Draw a class diagram of the business object model (using the UML design tool minUML)
- Design the database schema, and document the mapping between objects and tables, properties and columns
- Code the business object model
- Write the SQL create script for the database
- Look at alternative BOM – database mapping strategies:
a) Hard code the SQL
b) Use the tiSQLManager
c) Auto generate the SQL - Write the GUI and hook it up to the BOM
- Modify the application so it will connect to different databases
The order that we work through these steps shall be 1 to 5, then we will implement one of the strategies in 6 so we can write the GUI in 7. We will then return to 6 and implement the other two strategies before moving on to 8 where we will implement the swappable database connection layer.
At the end of this chapter we will have build a contact management application that will seamlessly connect to either Interbase using IBExpress, Paradox using the BDE or Access using ADO.
Prerequisites
This chapter builds on the concepts introduced in chapters 2, 3 and 4 so it will be a good idea to read these first. It also assumes that you have installed the tiOPF, details of which are described in chapter 5.
Application design: The use case
There are two actors and two use cases in the system: Administrators who are responsible for maintaining the contact list, and users who will be searching for a contact by name. These actors may or may not be the same person so a read only view will be necessary to prevent users from modifying data that only administrators should have access to. A diagram representing this is shown below:

Look and feel
The application will use a tree view on the left-hand side of the main form to browse and search for the contacts in the database. Initially, all the contacts will be loaded when the application starts, but we will probably want to change as the size of the database grows to provide database level searching.
Use case #1 Search for a contact
- Start the application and enough data about each entry in the database will load to allow a human to navigate.
- Scroll down the tree view and click on the required person – the person’s details will load and be shown on the right hand side of the application.
Use case #2 Maintain contacts
- Navigate to the contact to be changed as in use case #1, or click insert to add a new contact.
- Navigate to the part of the contact to be maintained (e.g., name, and phone number, postal address) and make edits.
- Click save button.
The class diagram
We shall implement the contact management application with 7 classes as shown in the class diagram below:
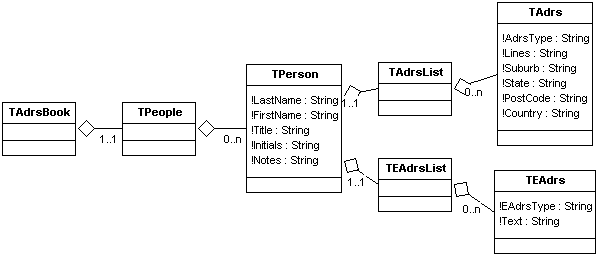
These classes have the following purposes:
Class |
Parent |
Description |
TContactMgr |
TtiObject |
The top of the hierarchy. Initially, this class will just be a holder for an instance of TPeople, but later we may extend it to contain lookup list data, and perhaps an instance of TCompanies |
TPeople |
TtiObjectList |
A collection of TPeople |
TPerson |
TtiObject |
A person object owned by TPeople. Has published properties for LastName, FirstName, Title and Initials. Has a property of type TAdrsList and TEAdrsList. |
TAdrsList |
TtiObjectList |
A container for TAdrs objects |
TEAdrsList |
TtiObjectList |
A container for TEAdrs objects |
TAdrs |
TtiObject |
Holds a conventional street or post office box address. Has published properties AdrsType, lines, suburb, state, postcode and country. |
TEAdrs |
TtiObject |
An electronic address object that belong to the TPerson. Has properties Address type and address text. |
The database schema & object – database mapping
We shall store the data modelled by these seven classes in three tables in the database as shown in the table below:
Class |
Table |
Property |
Column |
Notes |
TPerson |
Person |
OID |
OID |
Primary key |
|
|
FirstName |
First_Name |
|
|
|
LastName |
Last_Name |
|
|
|
Title |
title |
|
|
|
Initials |
initials |
|
|
|
Notes |
notes |
|
TAdrs |
Adrs |
OID |
oid |
Primary key |
|
|
Owner.OID |
owner_oid |
Foreign key to Person |
|
|
AdrsType |
lines adrs_type |
|
|
|
Suburb |
suburb |
|
|
|
State |
state |
|
|
|
PCode |
pcode |
|
|
|
Country |
country |
|
TEAdrs |
EAdrs |
OID |
oid |
Primary key |
|
|
Owner.OID |
owner_oid |
Foreign key to Person |
|
|
EAdrsType |
eadrs_type |
|
|
|
Text |
text |
|
A note about OIDs
The framework supports several methods of Object Identifier (OID) generation. Earlier versions of the framework used integers (which is what we will be using here), but there is additional support for HEX and GUID OIDs. If none of these are suitable, you can easily write your own by descending a new TOID descendent class defined in tiObject.pas. Remember to make your OID table in your database match the storage requirements of OID. You must remember to Use the appropriate OID class generation unit in your BOM otherwise you will get a runtime error message “Attempt to create unregistered OID class”. Likewise, you must also remember to include one and only one OID class generation unit.
Application construction
If you have not installed the tiOPF components, and setup the search path to give access to the tiOPF files, then do this now following the instructions under ‘Installing the tiOPF’
Create a new application
Create a directory to place the application source, and then create a Delphi project group called ContactMgr_PG and save it.
Add the Delphi packages tiPersist.dpk and tiPersistIBX.dpk (because we are starting by building an Interbase application with IBX) found in the \TechInsite\tiPersist directory.
Add a new Delphi project. Call the main form FormMain, and save its pas file as FMain.pas. Call the application ContactMgr.dpr
Arrange the projects in the project tree in the order of tiPersistCore, tiPersistIBX then ContactMgr. This is important because of the dependencies between the three projects. At the end of this, you will probably have a project tree that looks something like this:

I find the project tree provides a very hand way of navigating aroudn the framework files. If I can’t remember a unit or class name, I can double click on tiPersistCore and navigate all the units and classes in the package editor that pops up.
I like to have control over the directory that Delphi puts its output files, so go to Project Options and select the Directories/Conditionals tab. Check that the Directories/Conditionals settings of tiPersistCore and tiPersistIBX looks like this:

Note that we want to set the ‘Output directory’, ‘Unit output directory’ and ‘DCP output directory’. The location of the binaries and DCP files are the most important because we will have to reference these files in the application and will want to know where to look.
Set the ‘Output directory’ of the ContactMgr application to C:\TechInsite\Bin. It is important that this is the same directory the package BPL files will be placed in because the ContactMgr application will look for the persistence layer it is to load in the same directory as its executable.
Select Project | Build all projects (I set-up a speed button for this because I build all projects quite a bit), then run the ContactMgr and check the files have been output to the directories we expect.
Note, we really want to know where the BPL files are being placed. Delphi will put them in the \Delphi\Bin directory by default. If you have two copies of the same BPL on the search path, and Delphi is not loading the copy you think it is, it can cost you hours of unnecessary debugging (this one still catches me out sometimes).
Code the business object model
Setting up the pas files
Add a new unit to the project and save it under the name ContactMgr_BOM.pas. The root of the name is not important, but the _BOM bit is. We will be creating a family of three units with the names *_BOM,.pas, *_Cli.pas and *_Srv.pas to hold the business object model, server side visitors and client side single instance of the BOM
We have seven classes to create (TContactMgr, TPeople, TPerson, TAdrsList, TEAdrsList, TAdrs, and TEAdrs) and will create them one at the time, then populate them with some hard coded data. We will use tiShowPerObjAbs to look inside the objects as we are building them to confirm the structure is working as expected.
Load ContactMgr_BOM.pas in the editor and add tiVisitor to the uses clause. Add the class declaration for TContactMgr like this:
Setting up some code templates
Ctrl+Left Click TtiObject and you will be taken to its declaration. Directly above the declaration of TtiObject, there are two stubs of code (in comments) which you can paste into ContactMgr_BOM to help get started when writing the interface of TtiObject and TtiObjectList descendants.
I usually make two entries in Delphi's Code Insight to speed the process of creating TtiObject and TtiObjectList descendants. I add the following blocks of code:
TtiObjectList code stub. Code Insight Shortcut name: pol
TtiObject code stub. Code Insight Shortcut name: poa
Coding TContactMgr, TPeople and TPerson classes
We will code these three classes together, and then populate the object model with some data that is hard coded to test the framework.
Paste in code templates for TContactMgr (based on TtiObject), TPeople (based on TtiObjectList) and TPerson (based on TtiObject). Write forward declarations of the three classes, and then add an owned instance of TPeople to TContactMgr so the interface looks like this:
The constructor and destructor manage the creation and destruction of the owned instance of TPeople. Note that the property, People, is published so the automatic iteration code that we developed in the TVisited class will detect the owned class and pass the visitor over each node. We have also added the overridden function GetCaption where simply return the string ‘Contact manager’ in the implementation. This will become useful when we start building the GUI using the TtiTreeView.
Paste in a code stub for TPeople by copying the TtiObjectList template. Change the type of its Owner, and Items properties and modify the signature of their get and set methods. So Owner is of type TContactMgr and Items is of type TPerson. When you have finished, the interface of TPeople should look like this:
Hit Ctrl+Shift+C and Delphi will fill out the implementation of TPeople. You how have to hand craft the code for GetItems, SetItem, GetOwner, SetOwner and Add. This takes no time at all because I have Code Insight templates set-up for each of these called igi (inherited GetItems), isi (inherited SetItems), igo, iso and ia.
The finished implementation of TPeople looks like this:
And the finished implementation of TPerson looks like this:
This takes very little time to had code with the help of Code Insight, however it would be still quicker with the help of a wizard, or a UML tool to output the Delphi code. We will add this functionality to the tiOPF one day in the future.)
Next, add the properties LastName, FirstName, Title, Initials and notes to TPerson. Hit Ctrl+Shift+C and Delphi will finish off the interface declaration. The interface of TPerson now looks like this:
Testing TContactMgr, TPeople and TPerson classes
We shall now create a single instance of TContactMgr, populate it with some test data by hard coding. The question is, where shall the instance be created? Who shall be responsible for creating it? And who shall be responsible for freeing it?
I usually choose from one of three strategies:
- Create is as an application wide, globally visible Singleton. This is a useful technique when you are working with background data that can be shared between objects, or when you are creating a single form application like the one we are working on here.
- Create it as an owned property of some sort of manager class. This technique is good if there will be 0..n instances of the class, and you want to create them on demand and share them between client classes once they have been created.
- Create it and free it in a form Create and free it in the constructor and destructor of the class that it will interact with (often an application’s form, or main form). This is good for MDI applications when you might want several forms all editing the same class of object, but populated with different data.
We shall create the TContactMgr class as a Singleton because we are working with a single form application and it makes it easier to abstract persistence code away from the GUI.
Create a unit called ContactMgr_Cli.pas, and add the following code:
This fakes some of the behaviour expected from a Singleton. This technique will allow the singleton to be deleted, which is technically not permitted. It will also allow more than one instance of TContactMgr to be created which also violates the rules of a pure Singleton. The technique is, however, quick to code and easy to understand which is not the case for a pure GoF Singleton when implemented in Delphi.
Now, add the unit tiDialogs to the uses clause of the Implementation section of the main unit then drop a button on the application’s main form. Add the following code to the button’s OnClick event handler:
This will output the contents of the empty to TContactMgr to a popup dialog like this:

We will now populate TContactMgr with some hard coded data so create another unit called ContactMgr_TST.pas (TST stands for test) and add the following code:
This will populate the contact manager with yours truly.
We have to add a call to PopulateContactMgr somewhere in application and as we are going down the singleton route for the creation of the TContactMgr, we can add the code there:
This is what we are wanting so we can go on and create the remaining four classes.
Coding TAdrsList, TEAdrsList, TAdrs and TEAdrs
We shall not code the four classes TAdrsList, TEAdrsList, TAdrs and TEAdrs. There is a common property shared between TAdrs and TEAdrs called AdrsType, so we will create an abstract address class to provide this common behaviour, and descend both TAdrs and TEAdrs form this abstract class.
First, the interface of TPerson is extended with an owned instance of TAdrsList and TEAdrsList. These list classes are surfaced as published properties so they will be automatically detected by the iteration routine in the TVisited class. The interface extended interface of TPerson is shown below:
The implementation of TPerson is as you would expect with an instance of TAdrsList and TEAdrsList being created and destroyed in the constructor and destructor. There are four extra lines of code however where the owner relationship between TAdrsList, TEAdrsList, their list elements and the TPerson are set. In the implementation of GetCaption, we will return the string FirstName + ‘ ’ + LastName.
Now, from deep in the hierarchy, at say the TAdrs level, we want to be able to chain up the object hierarchy like this to get the owning person like this:
But with the TAdrs and TEAdrsList classes the way we would build them by default, the owner of a TAdrs is its TAdrsList. We really want the owner property of a TAdrs to reference the TPerson object like this:
This is achieved by setting the ItemOwner property of the TAdrsList and TEAdrsList objects like this:
This can be a little confusing. The owner of a TAdrs, from the point of view of the class being responsible for freeing the TAdrs is the TAdrsList. The owner of the TAdrs when TAdrs.Owner is called is the TPerson class, which is much more useful when traversing the object hierarchy. This is all taken care of in the TtiObject.Add method.
Next, we create the interface and implementation of TAdrsListAbs, TAdrsList and TEAdrsList. These consist of new implementations of the methods GetItems, SetItems, GetOwner, SetOwner and Add with the compiler warnings being suppressed by using the reintroduce key word. The type of the property Items has also been changed. By changing the type of these properties, along with their get and set methods we firm up the relationship between the collection class and the objects that it holds. This takes a bit of extra work up front, but we will be more than compensated in saved development, debugging and maintenance time. The interface of TAdrsList is shown below:
The interface of TAdrsList is not shown, but as you would expect, it follows the same pattern as TPeople with each of the Get and Set methods simply calling inherited with some type casting as necessary. The interface and implementation of TEAdrsList follows the same pattern as in TAdrsList with the methods each calling inherited with the appropriate types casting.
TAdrs and TEAdrs both descend from the common parent TAdrsAbs because the have the property AdrsType in common. The interface of TAdrsAbs is shown below:
In TAdrs, the type of the Owner property is changed to TPerson along with the corresponding Get and Set methods. The properties Lines, Suburb, PCode, State, and country are also added. The interface of TAdrs is shown below:
You will now need to add the tiUtils unit to ContactMgr_BOM’s uses clause, as this is where the tiStrTran function can be found. The implementation of GetCaption creates a single line view of the address and is shown below:
The interface of TEAdrs is the same as TAdrs except that the properties Lines, Suburb, etc are replaced with a single property called Text.
We can extend the PopulateContactMgr routine found in ContactMgr_TST.pas by creating instances of TAdrs and TEAdrs. This code looks like this:
When we run the application and click the button with the tiShowString() call, as expected we get the following dialog:

This completes our work with the business object model, so next we can set up the GUI to display the data using a combination of the TtiTreeView, TtiListView and TtiPerAware controls.
Setup the GUI to display the object hierarchy
Set-up the main form
Add a TToolBar, TActionList, TMainMenu, TStatusBar and TImageList to the form. Name the TToolBar TB, the TMainMenu MM, the TStatusBar SB, and the TImageList to ILButtons (we will eventually have 2 image lists on this form). Set the TToolBar’s Flat property to true, and change its height to 25. Add four buttons and two separators to the toolbar, positioning the separators before the 3rd and 4th buttons. Now, add a Close menu item to the File menu, and New, Delete and Save menu items to the Edit option of the main menu you added. We will hook up the appropriate actions in a moment.
Double click the image list and add the New, Delete, Save and Cancel images from the \TechInsite\Images\Buttons directory. Arrange the images in order as shown below:
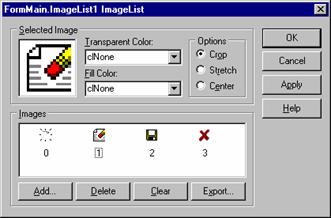
Double click the Action list and add four actions: aNew, aDelete, aSave and aClose. Setup their captions to read &New, &Delete, &Save and &Close, with their shortcuts being Ins, Del, Ctrl+S and Alt+F4. Note, that we can’t actually assign Alt+F4 as a shortcut key from the Object Inspector; we must do this by writing the following piece of code in the main form’s FormCreate event handler:
The Shortcut function is defined in the Menus unit, so don’t forget to add this to the uses clause, or your code will not compile.
Assign the image index properties of each action to match its image index in the image list. Set the Hint properties to ‘New’, ‘Delete’, ‘Save’ and ‘Close’. Double click each action and create an OnClick event handler. Wire up the actions to the tool buttons and main menu items so the form looks like the one shown below. Run and test.
Add the single command Close to the aCloseExecute event (to close the form and shut down the application.)

Add a TtiTreeView
Go to the TechInsite tab on the component pallet and add a TtiTreeView, which we shall name TV. Set its HasChildForms property to true, and SplitterVisible property to true. You can set it’s align property to alClient, but I prefer to do this in the form’s constructor because is leaves the form less cluttered at design time.
While we are in the form’s constructor, set the tree view’s Data property to point to the single instance of the TContactMgr. The form’s constructor will look like this:
Next, we will configure the tree view to display the necessary nodes of the object hierarchy, and hide the nodes we do not want to display. Click on the tree view’s DataMappings property and add three mappings to the collection editor. Set the mappings DataClass properties to TContactMgr, TPeople and TPerson. You will end up with a collection editor that looks like this:
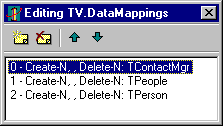
Run the application and you should see a tree view displaying the three levels of the contact manager class hierarchy: TContactMgr, TPeople and TPerson as shown below:

Next, we shall add a form to display the details of the TPerson on the right hand side of the tree view.
Add a form to display the currently selected node on the TtiTreeView
Add a new form to the project and save it with the file name FContactMgr_Person. (Make sure that it is not added to the projects list of auto create forms.) Give the form the name FormContactMgrPerson then add two TtiSplitterPanel(s), one inside the other, and three TLabel(s) to the form. Arrange the as shown below and set their Anchors properties so the panels resize as expected when the form is resized. (Note, you can change the properties of the TtiSplitterPanel by double clicking.)

The TtiTreeView can have a form associated with each data type it will display. When a node is selected, if it is registered against a form the form will be shown to the right hand side of the tree view. The tree view controls the form using RTTI so it must have a standard interface as shown in the code stub below, which can be found in the unit tiTreeView.pas.
Paste this code into the interface section of the newly create form and change the type of FData from TPersistent to TPerson. Add ContactMgr_BOM and ComCtlrs to the unit’s uses clause then press Ctlr+Shift+C so Delphi will create the implementation of the unit. (ComCtrls.pas is required because we have added a reference to a TTreeNode, which is defined in this unit.)
Add a TtiSplitterPanel to the form so we will be able to identify if when it is displayed by the tree view. Arrange the TtiSplitterPanel so its sides are about 8 pixels in from each edge, and then set its top, left, bottom and right anchors to true. Double click the TtiSplitterPanel and set its SplitterAlignment property to horizontal. Next, add a stub of implementation to the SetData and Valid methods as shown below:
Go to the application&'s main form and in the OnCreate event, add the line: TV.RegisterChildForm( TPerson, TFormContactMgrPerson ). This will associate the form we have just created with the TPerson class. The implementation of TformMain.OnCreate now looks like this:
Add FContactMgr_Person and ContactMgr_BOM to the main form’s uses clause then compile and test the application; you should see the form we created appear when a TPerson is selected. There should be no form visible on the right hand side of the tree view when a node that is not a TPerson is selected. The application should look this when it is running:

Next we will add some TPersistent aware controls to display the data associated with a TPerson.
Setup a form to display all the details of a TPerson
We must display five 'flat' properties including FirstName, LastName, Initials, Title and Notes. We will display the firs three with TtiPerAwareEdit controls, the title with a TtiPerAwareComboBox and Notes with a TtiPerAwareMemo. Add these controls to the form, then go to the SetData method and connect up the controls to the data property like this:
Run the application and when you select a person note in the tree view, you should see this:

The next step is to add two TtiListView(s) and connect them up to display the TAdrs(s) and TEAdrs(s). Add the TtiListView(s) and call them lvAdrs and lvEAdrs. Set their all their anchors properties to true connect them up to the TPerson in the SetData method like this:
Select lvEAdrs and click the ListColumns property in the property editor. The ListColumn collection editor will open. Add two collection items and set their FieldName and DisplayLabel properties as below:
Collection Item |
Field Name |
Display Label |
0 |
AdrsType |
Address type |
1 |
Caption |
Text |
The collection editor for the ListColumns property, along with the property editor for collection item 0 are shown below:
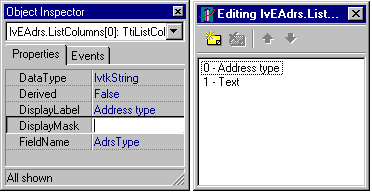
Repeat the process for lvAdrs and enter the values shown below:

Now that we have created the BOM, and build a GUI to display the data, we can create an Interbase database to save the objects to, and then write the Visitors to manage the mapping of objects to tables and properties to columns. After that, we will add edit and delete features to the GUI, and implement Visitors to save the objects.
Write the SQL create script for the database
In the section on database schema and object - database mapping, we identified three persistent objects that require three tables to store their information. Remind yourself of the way we decided to map objects to tables and properties to columns. The SQL schema to implement this will be written next, but first we must create an Interbase database, and then connect to it using a tool for running adhoc SQL statements.
Create the Interbase database
Make sure the Interbase server is running, and then load WinISQL (or what ever tool you prefer for creating an Interbase database) the dialog to create a database in WinISQL is shown below:
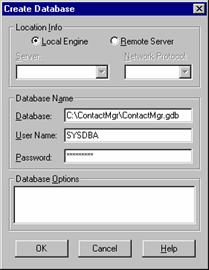
This will create an Interbase database called ContactMgr.gdb in the directory C:\ContactMgr\
Compile the tiSQLEditor
Add the application C:\TechInsite\SupportApps\tiSQLManager\tiSQLEditor.dpr to the project group. Check the command line parameters are entered as shown below:

The command line parameters have the following meanings:
Parameter switch |
Value |
Meaning |
-pl |
IBX |
Persistence layer name |
-d |
C:\ContactMgr\ContactMgr.gdb |
Database name |
-u |
SYSDBA |
User name |
-p |
masterkey |
Password |
The tiSQLEditor window should show like the one shown below:
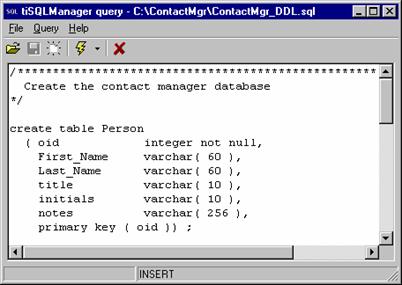
Enter the SQL create script shown below, then save it to C:\ContactMgr\ContactMgr_DDL.SQL
Note the first table created NEXT_OID. This is required by all databases the framework uses. It provides a central point for handing out Object Identifiers (OIDs). Without this table you will not be able to create any new objects.
You can run this script using either one of the tools that come with Interbase, or by selecting each statement, one at the time in the tiSQLEditor then clicking the run button. (This is my preferred approach for small scripts)
Insert some test data
Create another script in the tiSQLEditor and save it as ContactMgr_TestData.sql. Enter the SQL as shown below, then run the script, or run each statement one at the time by selecting it and pressing F8.
Test that the data has been correctly inserted by running the following queries in the tiSQLEditor:
The results of the third select statement are shown below:
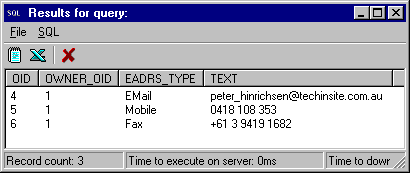
Now that we have created a database, and inserted some test data we can look at the various strategies available for mapping the database into the business objects we created.
Alternative BOM – database mapping strategies
There are three strategies available for mapping objects to a relational database:
- Hard code the SQL into the application, and use the Visitor framework to map the SQL to the objects. This is implemented by linking in the unit Adrs_SrvHardCodeSQL.pas
- Use the tiSQLManager application to maintain the SQL outside the application. This has the advantage of decoupling the SQL from the application, but the disadvantage of forcing you to add the tiSQLManager tables to the database. (This will be corrected when we have an XML persistence layer available)
- Set up mappings between the objects and tables, properties and columns and let the persistence framework generate the SQL for you. This can be implemented by linking in Adrs_SrvAutoGenSQL.pas (This strategy is under construction, and this example will work in most classes. There are some problems with BLOBS, and the way the mappings are defined is a little messy)
In summary, you must link in one and only one of the three unit files. The best way of achieving this is to create a dependencies unit that will provide a central point for determining the strategy to be used. Create a new unit called ContactMgr_Dependencies, which looks like this:
As you can see, the above example is using the auto-map option, but switching options is as simple as un-commenting the relevant unit (assuming you have created these units in the first place!). You now need to add this to the project source. Select Project...View Source and modify the source so it looks like the listing below:
Hard code the SQL
Create a new unit called ContactMgr_SvrHardCode.pas
Add tiPtnVisSQL to the visitor and type the interface as shown below:
Hit Ctrl+Shift+C to fill in the implementation
Add ContactMgr_BOM, tiQuery and tiObject to the implementation uses clause.
In the implementation of AcceptVisitor, type result := Visited is TPerson
In the implementation of Init, enter the SQL to select all the people. This can be simplified by entering SELECT * FROM PEOPLE in the tiSQLEditor and executing the query. There is then an option to copy the SQL to the clipboard with the delimeters and line breaks added. The result is shown below:
Enter the MapRowToObject implementation as shown below. This is made easier by executing the SELECT SQL, then using the SQL | MapRowToObject to copy the necessary code to the clipboard and pasting it into Delphi. The code looks like this as it is copied to the clipboard.
All you have to do is replace the T<Class type> place holders with TPerson and the result looks like this:
SetupParams has no code in the implementation:
Register the visitor with the persistence framework like this:
The 12 Visitors that comprise the full implementation of the Contact Manager persistence visitors, implemented by hard coding SQL can be found in ContactMgr_SrvHardCode.pas.
Use the tiSQLManager
Create the tiSQLManager tables
Write the tiSQLManager Visitors
Auto generate the SQL
Write the GUI and hook it up to the BOM
TFormMain
TformContactChildPerson
TFormEditAdrs
TFormEditEAdrs
Summary
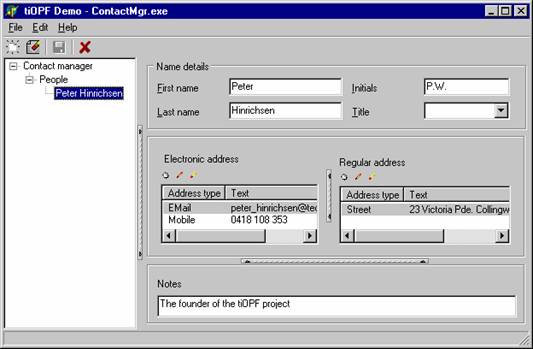
In this section we have looked at what is involved in developing a real-world application using the framework. We learnt how to design a Business Object Model (BOM) and create a suitable database schema for storage. We also learnt how to utilise some of the persistent-aware VCL controls that are provided with the framework, as well as looking at the pros and cons of the different BOM to Database mapping strategies.
The next section
We will discuss how to use the Adaptor pattern and runtime packages to create a swappable database connection layer. The next section can be read here.